Showing posts with label ROTW. Show all posts

Wednesday, June 22, 2011

Primal Apple Crisp

I mentioned previously that I was taking a trip into Primal land. If you don't know what that means then you can go here to check it out a bit. Basically, it is a theory that we should eat as our ancestors ate, our cavemen ancestors. Meaning a heavy reliance on meat and animal fats, no grains, legumes(beans), sugar, vegetable oils or potatoes. That is a very basic take on it, but if you are interested I encourage you to check out the website.

Friends of mine are also doing the Primal thing so I decided to make a dessert we could all enjoy. I was thinking that fruit dessert would be easiest, and decided to modify an apple crisp recipe. Below is what I make and I think it turned out pretty good. As I was making it I forgot that honey is an "acceptable" sweetener, so this is made without any additional sugar. However, if I made it again I would probably put honey on the apples, though it was sweet enough without it.


Primal Apple Crisp

Prep Time 30 mins : Bake Time 30 mins : Serves 12
Ingredients
8 Apples1
1/2 Cup walnuts
1/2-1 Cup Raisins
1/2-1 Cup Craisins(Dried Cranberries)
2 teaspoons cinnamon
2 teaspoons salt
nutmeg, optional
ginger, optional
cloves, optional

1/4 cup quinoa flakes2
1/2 cup coconut flour3
1 cup almond meal4

1/2 cup butter(1 stick)

Directions:
1. Preheat oven to 350 degrees. Core and slice the apples. If you are particular about your apples then feel free to peel them as well.
2. Place the apples, walnuts, craisins and raisins in a bowl and toss them with whichever spices you have chosen to use, but with at least the cinnamon and salt. Set aside.
3. Combine quinoa flakes, coconut flour and almond meal in a bowl. Use a pastry blender to mix in 1/4 cup butter (1/2 stick).
4. Spread apple mixture into a 9x13 pan. Use remaining 1/4 cup butter by cutting into pads and distributing over the mixture. Spread topping mixture evenly over the apples.
5. Bake for 30 minutes or until apples are bubbling and topping is browned. Like any crisp, this too would be delicious with ice cream or whipped cream, though not necessarily primal.


Foodnotes
1Often times apple dessert recipes call for granny smiths or special baking apples. Anytime I bake with apples I use whatever apple I want or is on sale. I am sure there are reasons for using specific apples, but I have never had issues with any of the ones I've tried. This time I used gala, pink lady and braeburn.
2I have only found out about this craziness of quinoa flakes, they had them in bulk at our food co-op. They are suppose to work very similarly to rolled oats and they substituted marvelously for this recipe.
3The coconut flour I found was Bob's Red Mill. I am sure you can find some online, though I got ours at our co-op. The package said it could be substituted for up to 1/3 of the flour in recipes. I used only it because I wasn't actually baking a cake or bread or anything that needed to rise in anyway.
4You can buy almond meal, it can get rather expensive sometimes. But my almond meal I made using my food processor. This recipe also had some walnuts in the "almond" meal.

Friday, June 10, 2011

Fermentation Update

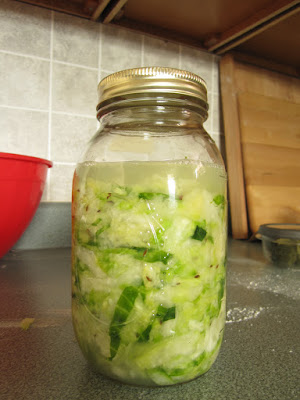
I posted earlier about my new venture into fermented foods. I put the glass jars on top of one of our kitchen cabinets so that I wouldn't look at it everyday and mess with it. Which was a rather good idea because I totally forgot about them after a while. When the month had passed we pulled them down and found some interesting things.

First, the sauerkraut has shifted. Apparently I hadn't pressed it down enough, because it expanded above the liquid level. This made me nervous, but there didn't appear to be any mold on the top. There were little stripes of white, but they didn't look like mold. The carrots also had some white that settled at the bottom which I couldn't remember if it was there before or not.

At the time Ben and I were both really sick and so we decided to wait until our immune systems had recovered before putting potentially harmful food into our bodies. A couple weeks later I got around to remembering that the fermented foods existed. We happen to be sitting down with some friends and asked them what they thought of their condition. We decided to open them up and see how they smelled. The sauerkraut was very strong smelling, but not unexpected. The carrots smelled like carrot wine, or at least what I think it would smell like. It was very interesting. Ben and I decided to each try a little bit of the sauerkraut and see if we'd die through the night.

::suspense:: We didn't die! We also didn't feel ill which would be a lot more likely.The sauerkraut taste was everything I imagined and more; definitely the best sauerkraut I have ever had.

About a week later we tried the carrots. When I went to the presentation, it was explained that they would be like carrot sticks. This is not what I they were like, at least not the carrot sticks I think of. They became entirely mushy once you try to remove them from the jar. They are also incredibly strong in flavor, and that's coming from someone who likes strong flavors. I am not sure if we let them go for too long or if I cut them is too small of pieces, but we won't be making them again. Right now I am trying to come up with an idea for how to use them in a recipe or something. I am thinking of trying to make a kimchi and adding them to that.

Verdict:

Sauerkraut will definitely happen again, I have been enjoying it a whole bunch. Carrots might happen again, but maybe using this recipe instead.

Is anyone else going to try it? Or have you fermented foods before?

Monday, June 6, 2011

Baked (Fried) Green Tomatoes

I don't really remember this movie, because I saw it so long ago. But I am pretty sure I really liked it.

Tomato season is soon upon us, and if you check out your local farmer's markets it has probably already hit. I was lucky enough a couple of weeks ago to find some beautiful green tomatoes. I was unable to resist their color. The classic fried green tomatoes is what I decided to make, but I wanted to see if I could make them tasty if they were baked. The result was pretty delicious, without the dripping oil.

Look at that amazing green

Baked Green Tomatoes

Prep Time 10 min : Cook Time 30 min : Servings 10

Ingredients:

Breading1
1/2 Cup Cornmeal
1/2 Cup Unseasoned Breadcrumbs
1/4 Cup Unbleached Flour
Hot Paprika
Salt
Pepper

Buttermilk
6 Green Tomatoes

1. Preheat the oven to 400 degrees. Slice the tops off of the tomatoes and continue to slice, crosswise, down the fruit.2
2. Combine the breading ingredients in a shallow bowl and mix well.
3. Place the buttermilk in a bowl, I usually start with a little bit (1/2 Cup) then add more when I need it.
4. Set up the breading train. Don't worry about keeping you fingers clean, your efforts will be futile.
5. Start with the buttermilk on both sides and then the breading.
6. Spray or grease a baking sheet. Place breaded slices on the sheet and the sheet into oven. Bake for 15 minutes. Flip the slices over and bake for another 15 minutes.
7. They should be golden brown and delicious. Serve immediately with homemade ranch dressing, because they are the best piping hot.

Foodnotes
1This isn't a precise measurement. It will depend on how well you bread each slice and how much they want to hold. You may need to add some more to the mix.
2One of the great things about green tomatoes is that they are firm and super easy to cut. You can use all those extra little tops and bottoms in a green tomato salsa.

Tuesday, April 19, 2011

Snobby Joes

We had a group of friends coming over for dinner last night and I was trying to think of something easy to make for a large group. Snobby Joes was definitely it. This recipe is from Veganomicon, a very valuable book to the vegan crowd. I change just a few things to make this recipe even more healthy than it already is. The "meat" of it is lentils, but it would be easy to substitute grass-fed ground beef. Though I would suggest you try it with the lentils as it is super tasty! Unfortunately I wasn't able to take any pictures of these, but I did steal one.


Image courtesty Seitan Is My Motor

Snobby Joes

Prep Time 10 Min : Cook Time 40 mins : Servings 4-6

Ingredients:
1 cup uncooked lentils1
4 cups water2
1 tablespoon olive oil
1 medium yellow onion, diced small
2-3 carrots, diced3
2 cloves garlic, minced
3 Tablespoons chili powder
2 teaspoons oregano
1 teaspoon salt
8 oz can tomato sauce
1/4 cup tomato paste
3 tablespoons maple syrup
1 tablespoon yellow mustard
4-6 buns4

Put the lentils in a small sauce pot and pour in 4 cups water. Cover and bring to a boil. Once boiling, lower heat and simmer for about 20 minutes, until lentils are soft. Drain and set aside.

About 10 minutes before the lentils are done boiling, preheat a medium soup pot or large saucepan over medium heat. In a covered microwave safe bowl, steam the carrots for about 2 minutes, no need to add additional water the carrots will have enough. Saute the onion and carrots in the oil for about 7 minutes, until softened. Add the garlic and saute a minute more. Add the cooked lentils, the chili powder, oregano and salt and mix. Add the tomato sauce and tomato paste. Cook for about 10 minutes.

Add the maple syrup and mustard and heat through.Turn the heat off and let sit for about 10 minutes.

Serve hot!

Courtesy of PPK(Post Punk Kitchen), a blog of one of the authors of Veganomicon.


Foodnotes:
1 We usually use red/orange lentils
2 I actually used a mix of water and whey, which I had left over from making cheese. Whey is awesome! FYI This makes the recipe not vegan.
3 The original recipe calls for green pepper, but I am not a fan of green pepper. And red, orange and yellow peppers are always incredibly expensive as well as hard to get local. Whereas carrots are cheap, filling and from our area!
4 We had delicious buns from Allegro Hearth in Squirrel Hill

Tuesday, April 12, 2011

Albondigas

Albondigas is the Spanish word for meatball. When I think of Albondigas, I think of the Mexican dish. The Mexican version consist of meatballs in a tomato broth soup. I found a few different recipes that I combined and then tweaked, there are still some changes that I would make in the future though. I noted these changes, if you would also prefer it to be a bit different in places. I hope you enjoy this delicious dish, after tonight it has become one of our new favorites.

Doesn't look as good as it tastes, unfortunately

Albondigas


For the "meatballs"1:
1 cup TVP flakes2
1 cup vegetable broth
1 cup brown rice
1 egg
1/2 onion diced
2 cloves garlic, minced
1/4 to 1/2 cup bread crumbs
1 teaspoon cumin
1 teaspoon ground coriander
1/2 teaspoon nutmeg
pinch of cinnamon
pinch of salt
olive oil

1. Cook rice. While rice is cooking heat vegetable broth to just below boiling. Place TVP flakes into vegetable broth and cover. Set aside.
2. In a large pan, saute garlic and onions in olive oil until browned.
3. Place cooked rice, onion/garlic mixture, rehydrated TVP, 1/4 cup of breadcrumbs and spices in a medium bowl. Mix together. If it looks like it needs some more breadcrumbs, add up to another 1/4 cup. Beat egg and add to mixture. Mix until well combined.
4. Stick your hands in and start making meatballs. Place on a plate until all of the mixture is formed. Should make about 15 meatballs.

5. Heat olive oil in the same pan you sauted the garlic and onions. Carefully place meatballs into the oil once it is heated up. You want to let them get really brown before you flip them for the first time. This way they will stay together better. Flip them around, browning on all sides to your liking. We like ours dark as you can see. If they crumble a bit that will be okay too, don't worry about it too much.
6. Once they are done to your liking, remove them from the pan and set aside.


For the sauce3:

1 onion, chopped
1 clove garlic, finely chopped
1 can diced tomatoes
2 Tablespoons ketchup
1 5.5 oz can V8
1 Tablespoon cayenne pepper4
1 cup vegetable stock
1 cup frozen peas (or fresh peas)
freshly-ground black pepper
1 tablespoon olive oil

1. Take the same frying pan you used to make the meatballs, add olive oil if necessary and heat. Cook the onion until it is soft, then add garlic and some pepper.
2. Once the onion is looking translucent, add in the vegetable broth and turn the heat up to high. Let it boil for about a minute.
3. Add the diced tomatoes, ketchup, and V8. Wait for it to boil again, then reduce heat to a simmer for 10 minutes.

4. Add peas and stir in cayenne. Let simmer for a few minutes.
5. Add meatballs and spoon sauce over the meatballs to make sure they are covered. Continue to simmer for another 10 minutes.
6. Serve HOT, preferably with some nice bread. We had Veg Bread,5, which worked really well.


Foodnotes:
1 This was a new veggie meatball recipe for me, and while the taste was nice, they were a little finicky on the frying pan. I had to be really delicate with them, so they wouldn't fall apart. I think next time I might try the beanball recipe from Veganomicon, one of my favorite veg cookbooks. But at least these ones tasted great.
2 TVP(textured vegetable protein) comes in many forms, we use the chunks and flakes. We always have both of them in the house because they can be used for so many different things and are dehydrated so they keep probably forever. I don't completely understand the process but it is a by-product of making soybean oil. If you are interested you can find out more here. TVP is available at the co-op in bulk and I have even seen it in some Giant Eagle's if you are in Pittsburgh.
3 When I think of Albondigas, I think of a soup. This turned out being more of a meatball with sauce dish. When I make this again I will probably put in a can of tomato sauce and at least another 2 cups of broth. You can find your own proportions depending on what you are feeling like, a brothy soup or a hearty sauce.
4 As I've mentioned before, we like the spicy in our house. If you don't, feel free to adjust the cayenne to whatever you feel like. However, this wasn't incredibly spicy, at all. If you decide to make the changes mentioned in foodnote 3 to make the dish more soupy, remember to keep in mind the cayenne will be even more diluted.
5 I had this idea to make basically zucchini bread out of a bunch of vegetables and make a double batch consisting of a large loaf pan and 2 dozen muffins. The result was what the house called "veg bread". It isn't sweet zucchini bread, it has definite vegetable taste and is only mildly sweet. It is good, but is much like the difference between complete pancake mix and buckwheat pancakes. Either way, it went surprisingly well with the Albondigas, the mild sweetness was highlighted in just the right way to completely compliment one another. If anyone is interested in the recipe, let me know and I can forward it, just be warned.

Tuesday, April 5, 2011

Fermentation

I don't know about you, but I love sauerkraut. I can eat it just by itself.

I was lucky enough to attend the Farm to Table Conference here in Pittsburgh. It is an awesome little conference where local farms and health conscious businesses come to share about their products. There were also speakers, demonstrations and kids activities. One company that was there was Zukay Live Foods. They are a PA company that specializes in non-dairy probiotic foods. They have juices, salsa, salad dressings and relishes, all of which are made with fermented vegetables.

Why Fermented Vegetables Are Important

Don't say anything about her, she is AWESOME!
Fermented foods are full of bacteria. Unfortunately in modern society, bacteria are equated with germs and germs are bad, so they are avoided like the plague(which is also a bacteria). However, not all bacteria are bad, our bodies are filled with good bacteria, or at least they should be. These good bacteria are all throughout our digestive systems making sure that our food is being digested properly so that we can get everything we need out of it. In most people now these good bacteria are far to low and can lead to digestive problems. This is why Jamie Lee Curtis is telling you to eat Activia, yogurt has the same delicious cultures that your digestive system needs.
These good bacteria can also be killed in our body by taking things like anti-biotics. Do I think you should not take these if your doctor prescribes them? No, but maybe up your fermented foods or yogurt intake afterwards to get all the good germs back.

Why it is important to eat RAW Fermented Foods

When you buy sauerkraut in the store it has been canned. This means that it has been cooked. When it's cooked all of the good bacteria has been fried alive! It no longer has the added help of the bacteria, it's just some tasty cabbage. When you ferment raw vegetables, you are keeping those bacteria alive and allowing them to prosper by breaking down the vegetables.


We were lucky enough to see a demonstration by Scott Grzybek of Zukay, who made two fermented recipes in front of us. They were so easy that I decided to share them with you this week. It's a TWO-FER!

Sauerkraut AKA deliciousness in a bottle


Tools
Knife
Ball or other type of jar
Bowl
Masher

Ingredients
Celtic Sea Salt (please read note)
Cabbage
Spring Water (please read note)
Fennel/Caraway seeds, optional

1. Do not wash your cabbage! You want all of that added goodness on there, this is why I bought organic as to ensure it was all good stuff and not chemicals. Remove the large outer leaves that are almost falling off3.Slice the cabbage as thin as you would like your sauerkraut.
2. Throw the sliced cabbage into the bowl and add salt. Scott said to add a few teaspoons, but looked like he was adding a few Tablespoons. He was my kind of guy with the non-measurement thing, but I added about two teaspoons to mine and it was doing fine.
3. If you have the time let the sauerkraut sit in the salt.
See the water pooling on the bottom
The salt will draw all the water out and make the sauerkraut cry. I had to go somewhere so I left mine for about an hour and a half, but 15-20 minutes would be sufficient. If you don't have the time to wait then you can force the process to move more quickly. You want to start "mashing" or beating down the cabbage. This will break it down more quickly. The purpose is to get as much water out as you can, because this water is going to ideally cover the cabbage once it is placed in the jar. If you don't have a lot of water, that's where the spring water will come in. Just work on the cabbage as long as you feel like it. You also want to add the fennel or caraway seeds in at this time if you are using them.
4. Once the cabbage is looking significantly beat. You can start stuffing it into your jar. Having a jar with a wide mouth really helps at this point. You want to squish out as much air as possible, so a small head of cabbage might not even fill your jar depending on what size it is. Just keep compacting and pushing the cabbage down, leaving no spaces or gaps. I also used a small ladle at this point because by hand couldn't reach the cabbage until it was much higher. The ladle really helped push it down.
5. When you feel confident that the cabbage can't possibly get anymore compact, look at the liquid level. If all of your cabbage isn't covered, this is where you need to add the spring water. Add enough to cover the cabbage, anything left out in the air is going to become moldy. Don't fill the jar all the way to the top with water, or cabbage, as it will expand when it ferments. Leave it some space.
6. Screw the lid on the top, but NOT too tight. As Scott explained, the pressure will build up while all the gases are being released and the bacteria are working. You want the weakest point in that jar to be the seal between the jar top and the lid, rather than the side of the jar. This is also why it is a good idea to place your jar into a casserole dish. This way if it leaks, which can happen, you won't have nasty, smelly juice all over your shelf or counter.
7. Place your jar in a place where it won't bug you for the next month. Ideally this place should be warm and out of direct sunlight. We put ours on top of a kitchen cabinet that doesn't get sun.
8. Wait a month. I know it is a really long cooking time. Scott said that at the bare minimum you should wait 3 weeks. But I want to make sure it is good, so I am waiting a month or more if I can take it.
9. Open and eat. You can refrigerate it after you open it, this will just slow down the bacteria. You can also freeze, though it might change the taste. Since it is fermented, it doesn't really have an expiration date, but hopefully it will be so tasty that you'll finish it quickly. Scott suggested putting it on the table with dinner and just adding some to whatever you are eating. If you can't tell I really like sauerkraut and love the excuse to have it every night.

Carrot Sticks


Tools
Knife
Ball or other type of jar

Ingredients
Celtic Sea Salt (please read note)
Carrots
Zukay Raw Veggie Medley Juice4
Spring Water (please read note)
1 clove garlic, optional5

1. Don't wash the carrots! You want all of that added goodness on there, this is why I bought organic as to ensure it was all good stuff and not chemicals. Cut the carrots into sticks or julienne them.
2. Put them in the jar, again rather snuggly. You want the jar nice and full of carrots.
3. There was some discussion as to whether or not the carrots needed salt, but I threw some in there because it wouldn't hurt. I put about a teaspoon. If you are adding garlic, slice the clove thinly and add it to the jar.
4.Add enough Zukay Juice to fill about 1/4 of the jar. Then fill the rest of the jar with spring water. Again, anything left out in the air is going to become moldy. Don't fill the jar all the way to the top with water, or carrots, as it will expand when it ferments. Leave it some space.
5. Screw the lid on the top, but NOT too tight. As Scott explained, the pressure will build up while all the gases are being released and the bacteria are working. You want the weakest point in that jar to be the seal between the jar top and the lid, rather than the side of the jar. This is also why it is a good idea to place your jar into a casserole dish. This way if it leaks, which can happen, you won't have nasty, smelly juice all over your shelf or counter.
6. Place your jar in a place where it won't bug you for the next month. Ideally this place should be warm and out of direct sunlight. We put ours on top of a kitchen cabinet that doesn't get sun.
7. Wait a month. I know it is a really long cooking time. Scott said that at the bare minimum you should wait 3 weeks. But I want to make sure it is good, so I am waiting a month or more if I can take it.
8. Open and eat. You can refrigerate it after you open it, this will just slow down the bacteria. You can also freeze, though it might change the taste. Since it is fermented, it doesn't really have an expiration date, but hopefully it will be so tasty that you'll finish it quickly. Scott said kids love these, because you can just pick them up and pop them in your mouth.

Foodnotes

1 You don't want to use table salt, this has been bleached and has had many of it's great minerals taken out of it. Scott suggested Celtic Sea Salt, Redmond's Real Salt or Himalayan Salt. All of which are available at the co-op. I personally used the celtic, oh man does it smell like the sea!
2 Don't use tap water to try to save money. The chlorine that most cities put into their water will kill the bacteria. I used regular Giant Eagle spring water, Scott says that they have well water where he lives and that works just fine.
3 All the vegetable remains in our house go into the broth pile. I don't get special veggies just to make broth, I just through everything in to a pot with peppercorn and a bit of salt and let it simmer.
4 Cabbage naturally has enough bacteria in it to ferment itself, other veggies need help. You have to add a culture to it, like Yogourmet Kefir Culture or something that already has cultures in it, like Zukays juices. I found getting the juice easier than having to deal with a powder. The juice is available at the co-op. The veggie medley is recommended as its flavor will work well with the carrots.
5 Our household has a saying, well it has a lot but this is one of them, "you can never have too much garlic". Apparently when it comes to fermenting you can. Be very careful with how much you add, garlic can add very strong (the bad kind of strong) flavor and smell to your fermented foods. Scott suggested never to add more that 1 or 2 cloves to a jar.

Please share if you have made your own sauerkraut, or other fermented foods, before or if you make this recipe. I would like to see how it has turned out for others.

Tuesday, March 29, 2011

Almond Milk Cop Out

Things have been slightly hectic here and I haven't had a chance to do a bigger and better recipe for this week. Also, there have been many requests for this almond milk recipe and I so love sharing it with people.

Almond milk is one of the best alternative milks because of its increased protein and great healthy fats. It is also naturally more creamy than other options like rice and soy milk. Though soy milk gets a unfair bad wrap, if you are looking to avoid it, almond milk is the best choice. I found this recipe on Vegan Reader. We have tried many almond milk and rice milk recipes and this is definitely our favorite.

She has awesome, easy to follow instructions. And there is even an added dessert recipe to help use the "waste". Please enjoy and thank you for accepting my laid back Recipe of the Week.

Almond Milk Recipe from Vegan Reader

Note: If you would like your milk a little bit sweeter, as some store bought almond milks are, add about 2 Tablespoons of PURE maple syrup to the blender.

Tuesday, March 22, 2011

Mac & Cheez

I really have started disliking the "clever" ways people play on words for vegetarian and vegan things. This recipe is more like Mac and Veg Sauce, but that just isn't appetizing. So I used the Cheez alternative, which really just makes me think of Cheez Whiz...Eww.

This is one of our favorite vegan dishes. It's nice and heavy, like normal Mac & Cheese, but is full of vegetable deliciousness.

This isn't a recipe that would fool someone, you can definitely tell there is something up with the sauce. (If you are interested in a good homemade vegan "cheese" sauce, this is one of my favorites. Just make sure you add extra lemon juice as it will add some nice cheesy tanginess.) The recipe below is a modification of this original recipe for 'No-Nooch, No-Tofu, Excellent Mac 'n' Cheese'. Nooch is another name for Nutritional Yeast Flakes. In my opinion of the biggest arguments against veganism is the issue of Vitamin B12. B12 is a vitamin that is important to the nervous system, and a severe deficiency can result in some pretty serious health problems including anemia and nervous system damage. Vitamin B12 is not available in any "natural" plant food form. The only way for vegans to get it is through supplements or fortified foods. Nutritional Yeast Flakes are one such fortified food. Nutritional Yeast is not like baking or brewer's yeast, but is often used to make cheese-like substitutes because of its nutty flavor. One of the changes I make to the original recipe is including "Nooch" as I like its flavor and texture.


Mac & Cheez


Prep Time 10 Min : Cook Time 15 mins : Servings 6

Special Equipment Needed
Food Processor or Blender

Ingredients
8 oz Macaroni1
2 Medium Sweet Potatoes2
4-5 Medium Carrots
1 Medium Onion
1 Tablespoon minced Garlic (about 2-3 cloves)
1/2 Cup Raw Cashews
1/4 Cup Lemon Juice
2 teaspoons Dijon Mustard
2 Tablespoons Vegan Margarine3
Salt and Pepper, to taste
Red Hot Pepper Flakes, optional
Prepping the Veggies

1. Place the cashews in a small bowl and cover with water. Allow them to soak whilst you are doing other things.
2. Chop the sweet potatoes, carrots and onions.
3. Put the sweet potatoes, carrots and onions in a large pot and cover with water. Bring water to a boil over high heat.
4. Once the water is boiling, turn down the heat and allow to boil on medium heat until the carrots and potatoes are tender, about 10 minutes.
5. Carefully drain the veggies, saving the liquid in a bowl.
6. Reserve 1/2 cup of the broth and place the rest back in the pot and bring to a boil. This is the liquid you will boil the pasta in, add additional water if necessary. When the broth water is boiling, cook the pasta accordingly.

my new food processor (see notes)
Food Processor: The Mother of All Small Appliances

7. As the pasta is cooking, drain the cashews and place them in the food processor.
8. Add the 1/2 cup reserved broth, garlic, lemon juice, mustard and margarine to the cashews. Process until smooth.
9. Add the veggies to the mix and process until smooth. The consistency should be like a thick sauce.
10. Taste the sauce and adjust the spices as needed, this is when you should add some salt and pepper.

Make It Spicy

Once your sauce is where you want it, assemble. Place some pasta in the bowl, followed by a healthy portion of sauce. Unlike other Mac & Cheese recipes where it's a 3/4 noodles to 1/4 sauce proportion, this dish is best when it is at least half and half. So be generous with the sauce. Sprinkle some red pepper flakes, or even your favorite hot sauce on top, and enjoy the veg!


Notes:
1 The East End Food Co-op has a great macaroni in their bulk section that is made from quinoa flour. It's awesome and has a bunch of added protein. If you don't know what quinoa (pronounced KEEN-wAH) is, it's a grain that is the only non-animal complete protein and super tasty.
2 There is always a debate over the difference between sweet potatoes and yams, but as I don't feel like getting into that here. I mean the root vegetable with the dark red/maroon-ish skin and the orange flesh.
3 I use Earth Balance when I want a vegan margarine. It is the tastiest to us, but anything would work.
4 Food processors are awesome. My old one broke a bit ago and I did a ton of research about this new one. It is agreed upon by almost all of the reviewers, consumer and professional, that this is basically the best food processor out there right now. It is the Cuisinart Prep 11 Plus DLC-2011. This was its inaugural ceremony and it preformed beautifully!

Tuesday, March 15, 2011

Eggs Pomodoro

...Or 10 steps to the culinary mastery of poaching an egg.

I had never poached an egg before, at least not in water. I use to call eggs that I microwaved a certain way poached, but after poaching eggs and eating them, those were definitely just microwaved eggs. So I decided it was time to change this and level up in my culinary skills. I am not sure how many of you have watched Julie & Julia, a movie I was very surprised that I highly enjoyed, but there is a scene where one of the main characters attempts to poach eggs. I had heard it was difficult to poach eggs and this scene reinforced that fear. From an episode of Secrets of a Restaurant Chef with Anne Burrell, I learned that you need to add a bit of vinegar to the water. Julia Child from Julie & Julia says you need very fresh eggs. Finally, Whitney Miller, the winner of Masterchef US, used a technique on the show where you swirl the water before you drop the egg in to be poached. With all of these tips, I set to work poaching eggs for the first time.

I originally wanted to do an Eggs Benedict,

Tuesday, March 8, 2011

Recipe of the Week, Launch!

...or Curried Sweet Potato and Lentil Stew.

I am absolutely obsessed with food. Eating it, cooking it, learning about where it comes from and how it is made. So I decided it would be a great idea to start a regular recipe of the week post. Sometimes they will be recipes of my own creation, sometimes ones straight out of a cookbook or from online. Mostly they will probably be somewhere in between.

I thought I would start off with an easy slow cooker recipe. This week our recipe comes from Betty Crocker Easy Everyday Vegetarian.